Animated库可以让开发者非常容易并且非常高效的性能实现各种的动画以及交互的方式。使用Animated的时候,我们只需要关注设置动画的实现和结束即可,然后在里边设置一个动画可配置的函数。间接着通过start/stop的方法来控制动画按照顺序执行。例如下面就是一个在加载的时候带有比较简单的弹跳动画的效果实例:
注意
这里的代码会导致gitpage build fail,所以不放在这里了,完整版请见:code
class Playground extends React.Component {
  constructor(props: any) {
    super(props);
    this.state = {
      bounceValue: new Animated.Value(0),
    };
  }
  render(): ReactElement {
    return (
      <Animated.Image                         // 基础组件: Image, Text, View
        source=

          ]
        }}
      />
    );
  }
  componentDidMount() {
    this.state.bounceValue.setValue(1.5);     // 动画开始的时候 设置一个比较大的值
    Animated.spring(                          // 动画可选类型: spring, decay, timing
      this.state.bounceValue,                 // Animate `bounceValue`
      {
        toValue: 0.8,                         // Animate to smaller size
        friction: 1,                          // Bouncier spring
      }
    ).start();                                // 开始执行动画
  }
}
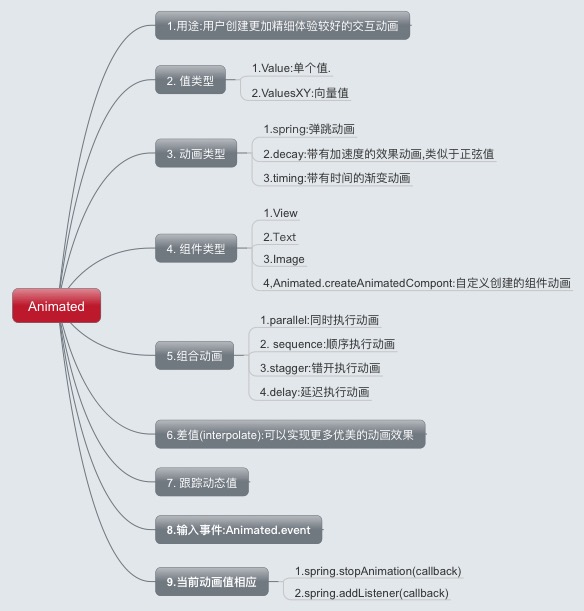
根据官方的文档整理梳理了一下Animated库需要了解并且掌握的相关内容图如下:

核心API(Core API)
我在使用动画的时候大部分需要使用的模块方法都来自Animated模块,该包括两个值类型:
①.Value代表单一值,ValueXY代表向量值。
②.三个动画类型:spring,decay和timing。
③.三个组件类型:View,Text和Image,并且另外通过Animated.createAnimatedComponent自定义创建的动画组件。
通过这三种动画类型我们几乎可以创建任何需要的动画效果:
- spring:该为弹跳类型的动画
①.friction: bounciness值,摩擦力值 默认为7
②.tension: 弹跳的速度值 默认为40
- decay:带有加速度值的动画,类似于正弦值
①.velocity:初始速度,必须要填写
②.deceleration:速度减小的比例,加速度。默认为0.997
- timing:带有时间的渐变动画
①.duration:设置动画持续的时间(单位为毫秒),默认为500ms
②.easing:动画效果的函数,大家可以查看Easing模块查询更多的预定义的函数。iOS平台的默认动画为Easing.inOut(Easing.ease)
③.delay: 动画执行延迟时间(单位:毫秒).默认为0ms
动画通过调用start方法开始执行,start方法可以设置一个回调方法,当动画执行完毕会进行调用该方法。如果动画是正常播放完毕的,那么该回调方法会被执行并且传入参数{finished:true}。但是如果动画是在正常播放完毕之前调用了stop来进行停止的话,那么该会回调传入{finished:false}。
组合动画(Composing Animations)
如果我们有多个动画,那么可以进行使用单个动画组合起来进行执行。具体可以通过parallel(同时执行),sequence(顺序执行),以及stagger和delay来进行组合使用动画。这个几个类型都可以传入一个需要执行的动画的数组,然后自动start/stop来进行开始动画或者停止动画。具体可以看一下官方的例子:
Animated.sequence([            // 首先执行decay动画,然后通知执行spring和twirl动画
  Animated.decay(position, {   // coast to a stop
    velocity: {x: gestureState.vx, y: gestureState.vy}, //通过手势设置相关速度
    deceleration: 0.997,
  }),
  Animated.parallel([          // 在decay动画执行完成以后,同时执行如下动画
    Animated.spring(position, {
      toValue: {x: 0, y: 0}    // return to start
    }),
    Animated.timing(twirl, {   // and twirl
      toValue: 360,
    }),
  ]),
]).start();                    //开启执行这顺序动画
插值动画(interpolate)
Animated库API还提供一个非常强大的功能是interpolate插值动画效果。该允许一个输入的区间范围映射到另外一个输入的区间范围。例如:一个简单的实例0-1的区间映射到0-100的区间范围:
value.interpolate({
  inputRange: [0, 1],
  outputRange: [0, 100],
});
interpolate还支持多段区间,该用来定义一些静态区间。例如:当我们输入为-300的时候取值相反值。然后在输入到-100的时候变成0,当输入接着0 的时候变成1,接着输入一直到100的时候又回到0。最终形成 的静态区间就为0。大于任何大于100的输入都返回0.具体事例如下:
value.interpolate({
  inputRange: [-300, -100, 0, 100, 101],
  outputRange: [300,    0, 1,   0,   0],
});
类似的映射例子如下:
value.interpolate({
  inputRange: [-400, -300, -200, -100, -50,0,50,100,101,200],
  outputRange: [450,    300, 150,  0,   0.5,1,0.5,0,0,0],
});

Animated.Value介绍
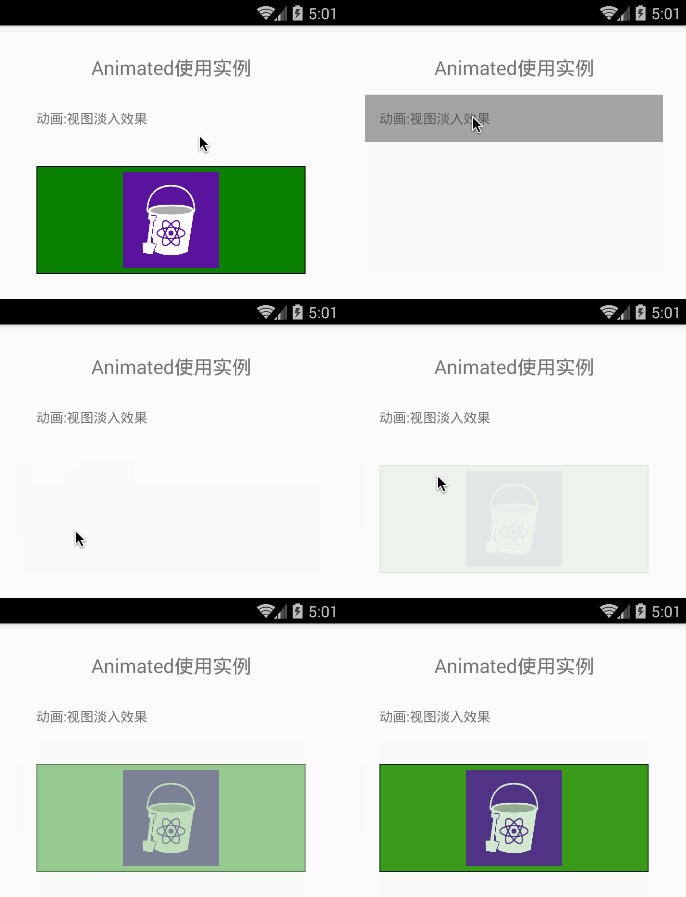
最基本的一个动画使用方式是创建一个Animated.Value,将该动画绑定到一个或者多个样式属性到动画组件中,然后通过开启动画运行。例如Animated.timing,或者采用Animated.event绑定到拖动或者滚动的手势中。除了绑定到样式中,Animated.Value也可以绑定到属性中(props),同样也可以加入插值动画。下面一个很简单的例子进行演示视图在加载的时候淡入显示:
class FadeInView extends React.Component {
   constructor(props) {
     super(props);
     this.state = {
       fadeAnim: new Animated.Value(0), // init opacity 0
     };
   }
   componentDidMount() {
     Animated.timing(          // Uses easing functions
       this.state.fadeAnim,    // The value to drive
       {toValue: 1},           // Configuration
     ).start();                // Don't forget start!
   }
   render() {
     return (
       <Animated.View          // Special animatable View
         style=> // Binds
         {this.props.children}
       </Animated.View>
     );
   }
 }
一个Animated.Value可以绑定驱动任何数量的动画属性,并且每一个属性可以通过插值函数来运行。插值通过两个区间进行映射,通过我们一般使用一个线性的插值函数,但是也可以使用其他的过渡函数。默认情况下,该当输入的区间超过范围时候,该也会进行相应的转换工作,不过我们可以设置把输出设置在一个可约束的范围之内。
下面我们来看一个实例,我们需要通过Animated.Value的值从0变化到1,组件的位置从150px移动到0px,同时透明度从0变化到1。我们可以非常方便的修改style就可以实现。如下代码:
build gitpage出现问题,代码删除
Animated.ValueXY介绍
Animated.ValueXY可以用来处理一些2D动画效果,例如滑动。当然还有一些其他的方法setOffset和getLayout可以用来帮助实现一些交互的动作,例如:拖拽操作。大家可以查看官方写的AnimationExample.js文件查看更多的使用例子。
- Value:AnimatedValue 数值的类,用于动画效果。通常我们使用new Animated.Value(0),进行初始化动画
- ValueXY:AnimatedValueXY 来用实现2D动画效果,例如拖拽操作等
实例
class DraggableView extends React.Component {
   constructor(props) {
     super(props);
     this.state = {
       pan: new Animated.ValueXY(), // inits to zero
     };
     this.state.panResponder = PanResponder.create({
       onStartShouldSetPanResponder: () => true,
       onPanResponderMove: Animated.event([null, {
         dx: this.state.pan.x, // x,y are Animated.Value
         dy: this.state.pan.y,
       }]),
       onPanResponderRelease: () => {
         Animated.spring(
           this.state.pan,         // Auto-multiplexed
           {toValue: {x: 0, y: 0}} // Back to zero
         ).start();
       },
     });
   }
   render() {
     return (
       <Animated.View
         {...this.state.panResponder.panHandlers}
         style={this.state.pan.getLayout()}>
         {this.props.children}
       </Animated.View>
     );
   }
 }
example
/**
 * Sample React Native App
 * https://github.com/facebook/react-native
 * @flow
 */

import React, { Component } from 'react';
import {
  AppRegistry,
  StyleSheet,
  Text,
  View,
  Image,
  Animated,
  TouchableHighlight,
  Easing,
} from 'react-native';

class CustomButton extends Component {
  render() {
    return (
      <TouchableHighlight
        style={styles.button}
        underlayColor="#a5a5a5"
        onPress={this.props.onPress}>
        <Text style={styles.buttonText}>{this.props.text}</Text>
      </TouchableHighlight>
    );
  }
}
//视图淡入效果
class FadeInView extends React.Component {
        state: any;
        constructor(props) {
          super(props);
          this.state = {
            fadeAnim: new Animated.Value(0), // 透明度为0
          };
        }
        componentDidMount() {
          Animated.timing(       // 使用timing过渡动画
            this.state.fadeAnim, // 开启动画的值
            {
              toValue: 1,        // 目标值
              duration: 3500,    // 配置延续时间
            },
          ).start();             // 开启动画
        }
        render() {
          return (
            <Animated.View   // 特殊带有动画的View视图
              style=>
              {this.props.children}
            </Animated.View>
          );
      }
}

class AnimatedDemo extends Component {
  constructor(props) {
    super(props);
    this.state = {
        show: true,
        anim: new Animated.Value(0),
        compositeAnim: new Animated.Value(0),
    };
    }
  render() {
    return (
      <View style=>
        <Text style={styles.welcome}>
          Animated使用实例
        </Text>
        <CustomButton text="动画:视图淡入效果"
        onPress={()=>{
           this.setState((state) => (
                    {show: !state.show}
            ));
        }}
        />
        {this.state.show && <FadeInView>
          <View style={styles.content}>
            <Image source={require('./imgs/logo.jpg')} style=/>
          </View>
        </FadeInView>}

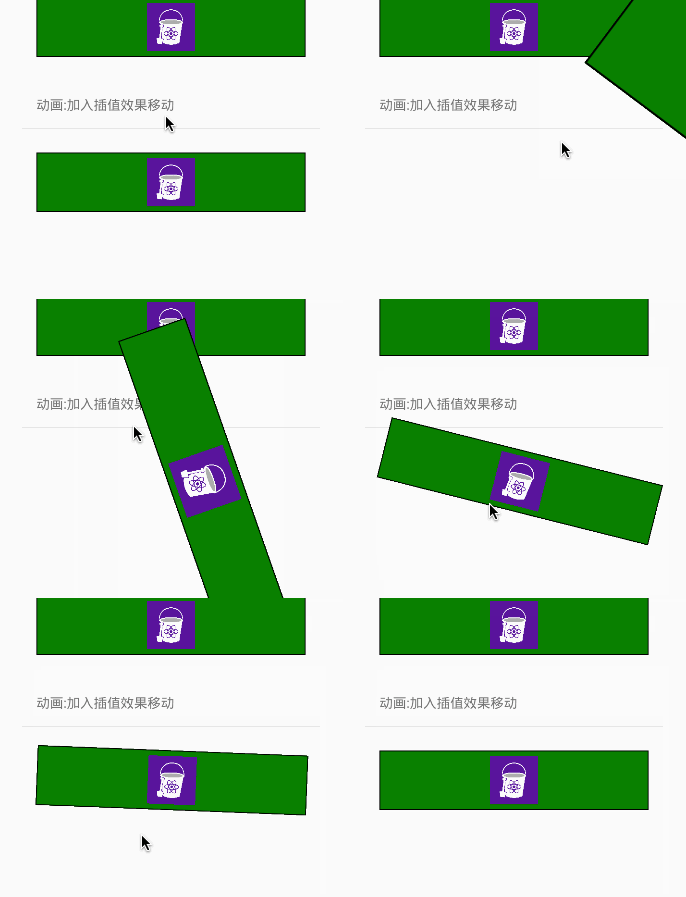
        <CustomButton text="动画:加入插值效果移动"
         onPress={()=>{
           Animated.spring(this.state.anim, {
              toValue: 0,
              velocity: 7,
              tension: -20,
              friction: 3,
            }).start();
         }}
        />
         <Animated.View
            style={[styles.content, {
              transform: [
                {scale: this.state.anim.interpolate({
                  inputRange: [0, 1],
                  outputRange: [1, 3],
                })},
                {translateX: this.state.anim.interpolate({
                  inputRange: [0, 1],
                  outputRange: [0, 300],
                })},
                {rotate: this.state.anim.interpolate({
                  inputRange: [0, 1],
                  outputRange: [
                    '0deg', '720deg'
                  ],
                })},
              ]}
            ]}>
            <Image source={require('./imgs/logo.jpg')} style=/>
          </Animated.View>
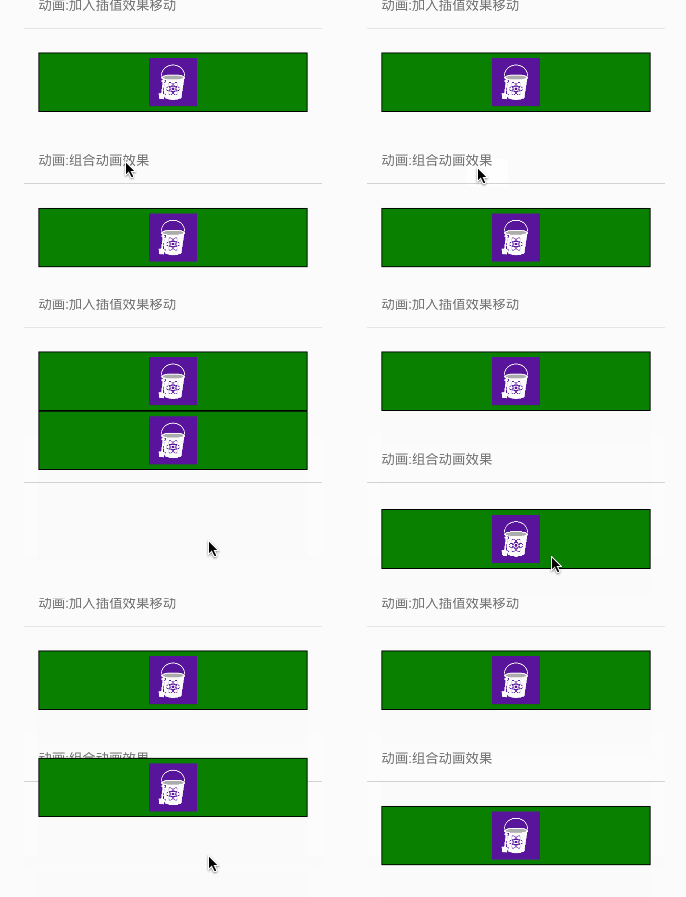
          <CustomButton text="动画:组合动画效果"
            onPress={()=>{
              Animated.sequence([
              Animated.timing(this.state.compositeAnim, {
                toValue: 100,
                easing: Easing.linear,
              }),
              Animated.delay(200),
              Animated.timing(this.state.compositeAnim, {
                toValue: 0,
                easing: Easing.elastic(2),
              }),
              Animated.delay(100),
              Animated.timing(this.state.compositeAnim, {
                toValue: 50,
                easing: Easing.linear,
              }),
              Animated.timing(this.state.compositeAnim, {
                toValue: 0,
                easing: Easing.elastic(1),
              })
              ]).start();
            }}
          />
          <Animated.View
                style={[styles.content, {
                   bottom:this.state.compositeAnim
                }]}>
                <Image source={require('./imgs/logo.jpg')} style=/>
              </Animated.View>
      </View>
    );
  }
}

const styles = StyleSheet.create({
  welcome: {
    fontSize: 20,
    textAlign: 'center',
    margin: 10,
  },
  button: {
    margin:5,
    backgroundColor: 'white',
    padding: 15,
    borderBottomWidth: StyleSheet.hairlineWidth,
    borderBottomColor: '#cdcdcd',
  },
  content: {
    backgroundColor: 'green',
    borderWidth: 1,
    padding: 5,
    margin: 20,
    alignItems: 'center',
  },
});

AppRegistry.registerComponent('AnimatedDemo', () => AnimatedDemo);
code
https://github.com/jiangqqlmj/AnimatedDemo
effect


