创建窗口
from PyQt5.QtWidgets import *
from PyQt5.QtCore import *
from PyQt5.QtGui import *
from PyQt5 import *
import sys
class MainWindow(QMainWindow):
def __init__(self, *args, **kwargs):
super().__init__(*args, **kwargs)
# 设置窗口标题
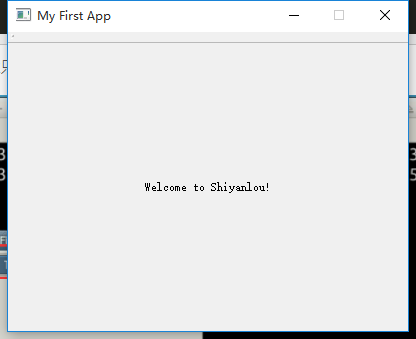
self.setWindowTitle('My First App')
self.setFixedSize(400,300)
# 设置标签
label = QLabel('Welcome to Shiyanlou!')
# 设置标签显示在中央
label.setAlignment(Qt.AlignCenter)
self.setCentralWidget(label)
# 创建应用实例,通过 sys.argv 传入命令行参数
app = QApplication(sys.argv)
# 创建窗口实例
window = MainWindow()
# 显示窗口
window.show()
# 执行应用,进入事件循环
app.exec_()
这里需要说明的是 Qt 的执行机制。 Qt 的程序通过创建 QApplication 类实例来调用 app.exec_ 方法进入事件循环。此时程序一直在循环监听各种事件并把它们放入消息队列中,在适当的时候从队列中取出处理。
信号与槽
Qt 中每种组件都有所谓的信号槽(slot)机制。可用来将信号与相应的处理函数进行连接绑定。
...
class MainWindow(QMainWindow):
    def __init__(self, *args, **kwargs):
        super().__init__(*args, **kwargs)

        self.windowTitleChanged.connect(self._my_func)
        ...

    # 自定义的信号处理函数
    def _my_func(self, s='my_func', a=100):
        dic = {'s': s, 'a': a}
        print(dic)

...
app.exec_()
这里将 QMainWindow 的信号 windowTitleChanged 与 _my_func 槽函数相绑定,当窗口标题被更改的信号发出的时候便会触发函数 _my_func 进行处理。
其中在自定义函数 _my_func 中允许设置任意多个参数。
当 windowTitleChanged 信号在被触发的时候向处理函数 _my_func 传递了一个参数也就是窗口标题。当然也有办法忽略这个值,就是采用 lamda 产生式。其原理就是通过 lamda 产生式的参数 x 捕获标题字符串,然后将 x 废弃不用,从而避免标题传入 _my_func。
修改如下:
self.windowTitleChanged.connect(lambda x: self._my_func('Shiyanlou', 666))
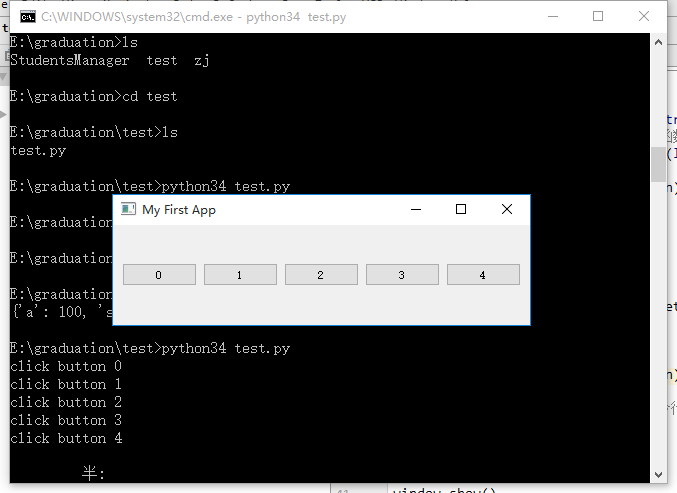
为了更加直观地理解信号与槽,我们进一步修改代码,通过创建按钮响应按钮事件来展示信号与槽机制。
class MainWindow(QMainWindow):
    def __init__(self, *args, **kwargs):
        super().__init__(*args, **kwargs)

        # 设置窗口标题
        self.setWindowTitle('My First App')

        # 添加布局
        layout = QHBoxLayout()

        # 创建按钮
        for i in range(5):
            button = QPushButton(str(i))
            # 将按钮按压信号与自定义函数关联
            button.pressed.connect(lambda x=i: self._my_func(x))
            # 将按钮添加到布局中
            layout.addWidget(button)

        # 创建部件
        widget = QWidget()
        # 将布局添加到部件
        widget.setLayout(layout)
        # 将部件添加到主窗口上
        self.setCentralWidget(widget)

    # 自定义的信号处理函数
    def _my_func(self, n):
        print('click button %s' % n)
另外 Qt 还支持自定义信号,可以通过创建 pyqtSignal 对象实例来定义信号对象。
class MainWindow(QMainWindow):
    # 自定义信号
    my_signal = pyqtSignal(str)

    def __init__(self, *args, **kwargs):
        super().__init__(*args, **kwargs)

        # 设置窗口标题
        self.setWindowTitle('My First App')

        button = QPushButton('Click me!')
        button.pressed.connect(self._click_button)
        # 将自定义信号与相应的槽函数连接
        self.my_signal.connect(self._my_func)
        # 将部件添加到主窗口上
        self.setCentralWidget(button)

    # 自定义的信号处理函数
    def _click_button(self):
        # 当按钮被点击的时候将发出信号 my_signal
        self.my_signal.emit('shiyanlou')

    def _my_func(self, s):
        print(s)

以上过程实际上就是将按钮按压信号与 _click_button 槽关联,而一旦调用了 _click_button 函数之后又会触发 my_signal 信号,继而调用 my_signal 信号的槽进行处理。
上述调用过程实际上没有任何意义,仅仅只是为了展示 Qt 具备有自定义信号的功能。
工具栏与菜单
通常我们使用的软件窗口顶部还会有一条工具栏或者菜单栏。
可以使用 Qt 提供的 QToolBar 创建工具栏。
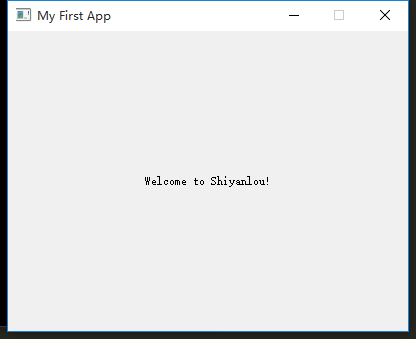
class MainWindow(QMainWindow):
    def __init__(self, *args, **kwargs):
        super().__init__(*args, **kwargs)

        # 设置窗口标题
        self.setWindowTitle('My First App')

        # 设置标签
        label = QLabel('Welcome to Shiyanlou!')
        # 设置标签显示在中央
        label.setAlignment(Qt.AlignCenter)
        # 添加标签到主窗口
        self.setFixedSize(400,300)
        self.setCentralWidget(label)

        # 创建工具栏
        tb = QToolBar('Tool Bar')
        # 添加工具栏到主窗口
        self.addToolBar(tb)
由于我们尚未给工具栏添加任何实际功能,所以工具栏只能看到一条空白的横线。
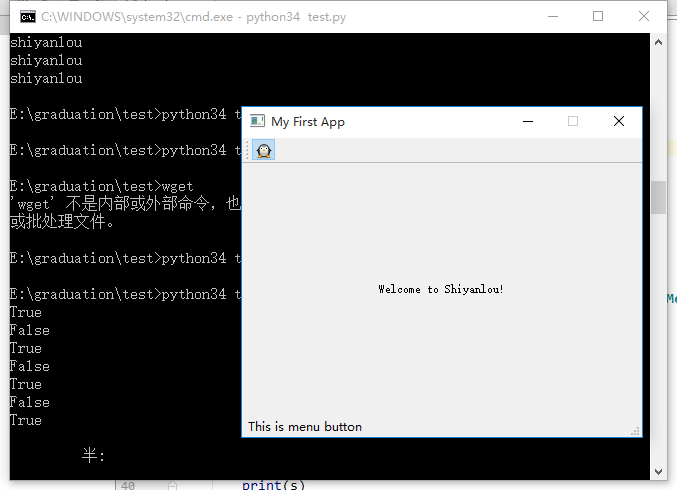
接下来我们为工具栏添加实体按钮,并在窗口底部显示提示信息
class MainWindow(QMainWindow):
    def __init__(self, *args, **kwargs):
        super().__init__(*args, **kwargs)

        # 设置窗口标题
        self.setWindowTitle('My First App')

        # 设置标签
        label = QLabel('Welcome to Shiyanlou!')
        # 设置标签显示在中央
        label.setAlignment(Qt.AlignCenter)
        # 添加标签到主窗口
        self.setCentralWidget(label)
        self.setFixedSize(400,300)
        # 创建工具栏
        tb = QToolBar('Tool Bar')
        # 设置工具栏中按钮的大小
        tb.setIconSize(QSize(16, 16))
        # 添加工具栏到主窗口
        self.addToolBar(tb)

        # 添加按钮动作,并加载图标图像
        button_action = QAction(QIcon('icons/penguin.png'), 'Menu button', self)
        # 设置状态栏提示
        button_action.setStatusTip('This is menu button')
        button_action.triggered.connect(self.onButtonClick)
        button_action.setCheckable(True)
        # 添加到工具栏
        tb.addAction(button_action)
        # 为主窗口设置状态栏
        self.setStatusBar(QStatusBar(self))

    def onButtonClick(self, s):
        print(s)
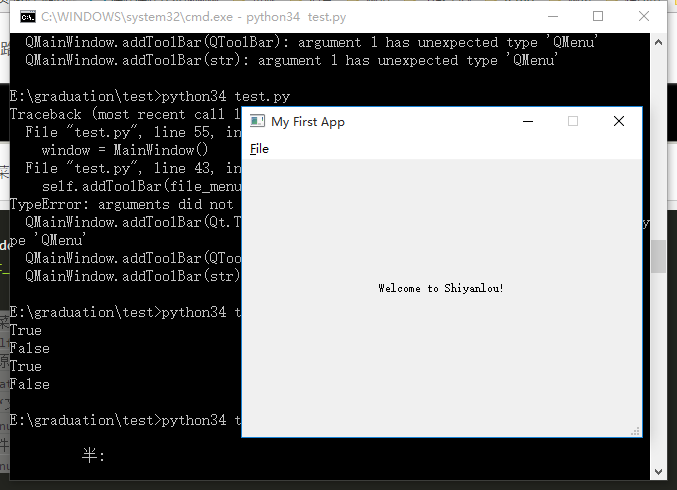
接下来为应用添加菜单栏。
...
class MainWindow(QMainWindow):
    def __init__(self, *args, **kwargs):
        ...

        # 添加菜单栏
        mb = self.menuBar()
        # 禁用原生的菜单栏
        mb.setNativeMenuBar(False)
        # 添加“文件”菜单
        file_menu = mb.addMenu('&File')
        # 为文件菜单添加动作
        file_menu.addAction(button_action)
...
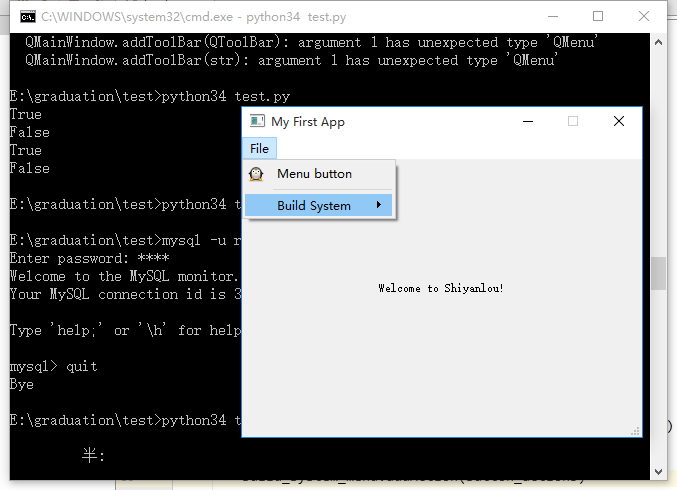
当然我们还可以实现二级菜单。
...
class MainWindow(QMainWindow):
    def __init__(self, *args, **kwargs):
        ...

        # 添加新的菜单选项
        button_action2 = QAction('C++', self)
        button_action3 = QAction('Python', self)
        button_action2.setCheckable(True)
        button_action3.setCheckable(True)
        button_action2.triggered.connect(self.onButtonClick)
        button_action3.triggered.connect(self.onButtonClick)

        # 添加菜单栏
        mb = self.menuBar()
        # 禁用原生的菜单栏
        mb.setNativeMenuBar(False)
        # 添加“文件”菜单
        file_menu = mb.addMenu('&File')
        # 为文件菜单添加动作
        file_menu.addAction(button_action)
        # 为菜单选项添加分隔符
        file_menu.addSeparator()

        # 添加二级菜单
        build_system_menu = file_menu.addMenu('&Build System')
        build_system_menu.addAction(button_action2)
        build_system_menu.addSeparator()
        build_system_menu.addAction(button_action3)
...
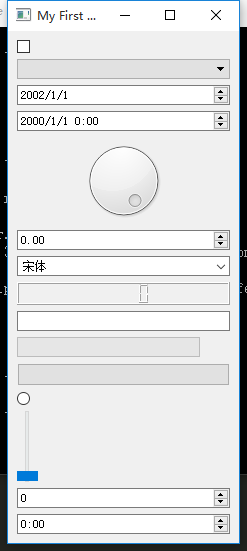
窗口部件
Qt 还有一个强大的部件类 QWidgets ,基于这个类派生出很多其它小部件,比如 Dial,Slider,CheckBox 等等 ,详情可参见官方文档:http://doc.qt.io/qt-5/qwidget.html
...
class MainWindow(QMainWindow):
    def __init__(self, *args, **kwargs):
        super().__init__(*args, **kwargs)
        # 设置窗口标题
        self.setWindowTitle('My First App')

        # 定义布局
        layout = QVBoxLayout()

        # 展示的部件列表
        widgets = [QCheckBox,
                QComboBox,
                QDateEdit,
                QDateTimeEdit,
                QDial,
                QDoubleSpinBox,
                QFontComboBox,
                QLCDNumber,
                QLineEdit,
                QProgressBar,
                QPushButton,
                QRadioButton,
                QSlider,
                QSpinBox,
                QTimeEdit]

        # 将部件添加到列表中
        for item in widgets:
            layout.addWidget(item())

        widget = QWidget()
        widget.setLayout(layout)
        self.setCentralWidget(widget)
...
布局
Qt 支持多种控件布局方式,主要有:
- 垂直布局
- 水平布局
- 网格布局
当然这些布局方式之间也都支持混合嵌套使用。
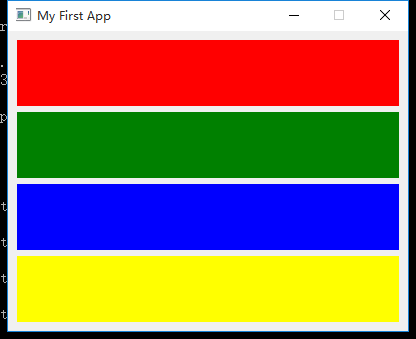
垂直布局
为了更加直观的看到布局效果,我们这里定义了一个新类 Color 继承自 QWidget 用于显示色块。
# 用于显示色块
class Color(QWidget):
    def __init__(self, color, *args, **kwargs):
        super().__init__(*args, **kwargs)
        self.setAutoFillBackground(True)

        palette = self.palette()
        palette.setColor(QPalette.Window, QColor(color))
        self.setPalette(palette)

class MainWindow(QMainWindow):
    def __init__(self, *args, **kwargs):
        super().__init__(*args, **kwargs)
        # 设置窗口标题
        self.setWindowTitle('My First App')

        colors = ['red', 'green', 'blue', 'yellow']
        # 水平布局
        layout = QVBoxLayout()

        for color in colors:
            layout.addWidget(Color(color))

        widget = QWidget()
        widget.setLayout(layout)
        self.setFixedSize(400,300)
        self.setCentralWidget(widget)
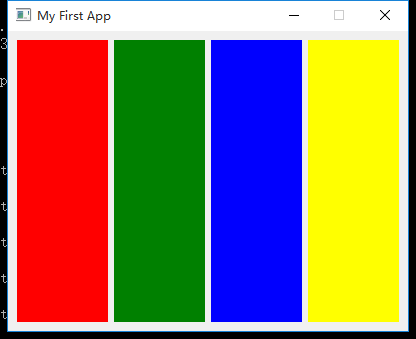
水平布局
知道了垂直布局之后,水平布局也相当简单,就是将 QVBoxLayout 修改为 QHBoxLayout 。
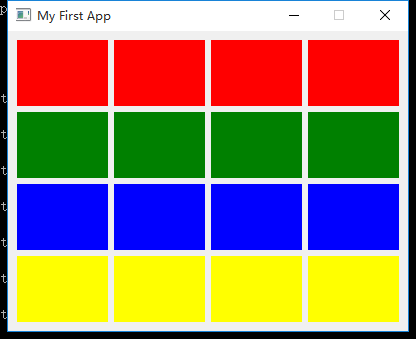
网格布局
class MainWindow(QMainWindow):
    def __init__(self, *args, **kwargs):
        super().__init__(*args, **kwargs)
        # 设置窗口标题
        self.setWindowTitle('My First App')

        colors = ['red', 'green', 'blue', 'yellow']
        # 网格布局
        layout = QGridLayout()

        for i, color in enumerate(colors):
            for j in range(len(colors)):
                layout.addWidget(Color(color), i, j)

        widget = QWidget()
        widget.setLayout(layout)
        self.setFixedSize(400,300)
        self.setCentralWidget(widget)
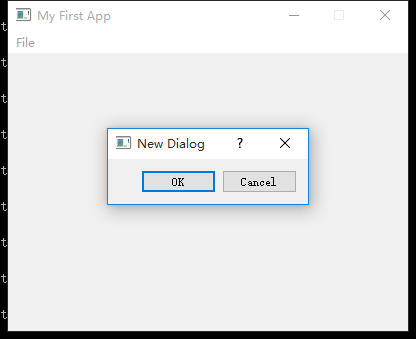
对话框
class CustomDialog(QDialog):
    def __init__(self, *args, **kwargs):
        super().__init__(*args, **kwargs)
        self.setWindowTitle('New Dialog')
        # 添加按钮选项
        QBtn = QDialogButtonBox.Ok | QDialogButtonBox.Cancel
        buttonBox = QDialogButtonBox(QBtn)
        buttonBox.accepted.connect(self.accept)
        buttonBox.rejected.connect(self.reject)

        layout = QVBoxLayout()
        layout.addWidget(buttonBox)
        self.setLayout(layout)

class MainWindow(QMainWindow):
    def __init__(self, *args, **kwargs):
        super().__init__(*args, **kwargs)

        # 设置窗口标题
        self.setWindowTitle('My First App')

        # 设置标签
        label = QLabel('Welcome to Shiyanlou!')
        # 设置标签显示在中央
        label.setAlignment(Qt.AlignCenter)
        # 添加标签到主窗口
        self.setCentralWidget(label)

        # 添加按钮动作,并加载图标图像
        button_action = QAction('New dialog', self)
        button_action.triggered.connect(self.onButtonClick)

        # 添加菜单栏
        mb = self.menuBar()
        # 禁用原生的菜单栏
        mb.setNativeMenuBar(False)
        # 添加“文件”菜单
        file_menu = mb.addMenu('&File')
        # 为文件菜单添加动作
        file_menu.addAction(button_action)
        self.setFixedSize(400,300)


    def onButtonClick(self, s):
        # 创建对话框
        dlg = CustomDialog(self)
        # 运行对话框,这一步非常重要!!!
        dlg.exec_()