转载
开源项目 OkHttp
在Android、Java开发领域中,相信大家都听过或者在使用Square家大名鼎鼎的网络请求库——OkHttp——https://github.com/square/okhttp ,当前多数著名的开源项目如 Fresco、Glide、 Picasso、 Retrofit都在使用OkHttp,这足以说明其质量,而且该项目仍处在不断维护中。
问题
在分析okhttp源码之前,我想先提出一个问题,如果我们自己来设计一个网络请求库,这个库应该长什么样子?大致是什么结构呢?
下面我和大家一起来构建一个网络请求库,并在其中融入okhttp中核心的设计思想,希望借此让读者感受并学习到okhttp中的精华之处,而非仅限于了解其实现。
笔者相信,如果你能耐心阅读完本篇,不仅能对http协议有进一步理解,更能够学习到世界级项目的思维精华,提高自身思维方式。
思考
首先,我们假设要构建的的网络请求库叫做WingjayHttpClient,那么,作为一个网络请求库,它最基本功能是什么呢?
在我看来应该是:接收用户的请求 -> 发出请求 -> 接收响应结果并返回给用户。
那么从使用者角度而言,需要做的事是:
- 创建一个Request:在里面设置好目标URL;请求method如GET/POST等;一些header如Host、User-Agent等;如果你在POST上传一个表单,那么还需要body。
- 将创建好的Request传递给WingjayHttpClient。
- WingjayHttpClient去执行Request,并把返回结果封装成一个Response给用户。而一个Response里应该包括statusCode如200,一些header如content-type等,可能还有body 到此即为一次完整请求的雏形。那么下面我们来具体实现这三步。
雏形实现
下面我们先来实现一个httpClient的雏形,只具备最基本的功能。
创建Request类
首先,我们要建立一个Request类,利用Request类用户可以把自己需要的参数传入进去,基本形式如下:
class Request {
	String url;
	String method;
	Headers headers;
	Body requestBody;

	public Request(String url, String method, @Nullable Headers headers, @Nullable Body body) {
		this.url = url;
		...
	}
}
将Request对象传递给WingjayHttpClient
我们可以设计WingjayHttpClient如下:
class WingjayHttpClient {
	public Response sendRequest(Request request) {
		return executeRequest(request);
	}
}
执行Request,并把返回结果封装成一个Response返回
class WingjayHttpClient {
	...
	private Response executeRequest(Request request) {
		//使用socket来进行访问
		Socket socket = new Socket(request.getUrl(), 80);
		ResponseData data = socket.connect().getResponseData();
		return new Response(data);
	}
	...
}

class Response {
	int statusCode;
	Headers headers;
	Body responseBody
	...
}
功能扩展
利用上面的雏形,可以得到其使用方法如下:
Request request = new Request("https://wingjay.com");
WingjayHttpClient client = new WingjayHttpClient();
Response response = client.sendRequest(request);
handle(response);
然而,上面的雏形是远远不能胜任常规的应用需求的,因此,下面再来对它添加一些常用的功能模块。
重新把简陋的user Request组装成一个规范的http request
一般的request中,往往用户只会指定一个URL和method,这个简单的user request是不足以成为一个http request,我们还需要为它添加一些header,如Content-Length, Transfer-Encoding, User-Agent, Host, Connection, 和 Content-Type,如果这个request使用了cookie,那我们还要将cookie添加到这个request中。
我们可以扩展上面的sendRequest(request)方法:
[class WingjayHttpClient]

public Response sendRequest(Request userRequest) {
    Request httpRequest = expandHeaders(userRequest);
    return executeRequest(httpRequest);
}

private Request expandHeaders(Request userRequest) {
    if (userRequest.header("Connection") == null) {
      requestBuilder.header("Connection", "Keep-Alive");
    }

    if (userRequest.header("User-Agent") == null) {
      requestBuilder.header("User-Agent", Version.userAgent());
    }
    ...
}
支持自动重定向
有时我们请求的URL已经被移走了,此时server会返回301状态码和一个重定向的新URL,此时我们要能够支持自动访问新URL而不是向用户报错。
对于重定向这里有一个测试性URL:http://www.publicobject.com/helloworld.txt ,通过访问并抓包,可以看到如下信息:

因此,我们在接收到Response后要根据status_code是否为重定向,如果是,则要从Response Header里解析出新的URL-Location并自动请求新URL。那么,我们可以继续改写sendRequest(request)方法:
[class WingjayHttpClient]

private boolean allowRedirect = true;
// user can set redirect status when building WingjayHttpClient
public void setAllowRedirect(boolean allowRedirect) {
	this.allowRedirect = allowRedirect;
}

public Response sendRequest(Request userRequest) {
		Request httpRequest = expandHeaders(userRequest);
		Response response = executeRequest(httpRequest);
		switch (response.statusCode()) {
			// 300: multi choice; 301: moven permanently;
			// 302: moved temporarily; 303: see other;
			// 307: redirect temporarily; 308: redirect permanently
			case 300:
			case 301:
			case 302:
			case 303:
			case 307:
			case 308:
				return handleRedirect(response);
			default:
				return response;
		}

}
// the max times of followup request
private static final int MAX_FOLLOW_UPS = 20;
private int followupCount = 0;

private Response handleRedirect(Response response) {
	// Does the WingjayHttpClient allow redirect?
	if (!client.allowRedirect()) {
		return null;
	}

	// Get the redirecting url
	String nextUrl = response.header("Location");

	// Construct a redirecting request
	Request followup = new Request(nextUrl);

	// check the max followupCount
	if (++followupCount > MAX_FOLLOW_UPS) {
		throw new Exception("Too many follow-up requests: " + followUpCount);
	}

	// not reach the max followup times, send followup request then.
	return sendRequest(followup);
}
利用上面的代码,我们通过获取原始userRequest的返回结果,判断结果是否为重定向,并做出自动followup处理。
一些常用的状态码
100~199:指示信息,表示请求已接收,继续处理
200~299:请求成功,表示请求已被成功接收、理解、接受
300~399:重定向,要完成请求必须进行更进一步的操作
400~499:客户端错误,请求有语法错误或请求无法实现
500~599:服务器端错误,服务器未能实现合法的请求
** 支持重试机制**
所谓重试,和重定向非常类似,即通过判断Response状态,如果连接服务器失败等,那么可以尝试获取一个新的路径进行重新连接,大致的实现和重定向非常类似,此不赘述。
Request & Response 拦截机制
这是非常核心的部分。
通过上面的重新组装request和重定向机制,我们可以感受的,一个request从user创建出来后,会经过层层处理后,才真正发出去,而一个response,也会经过各种处理,最终返回给用户。
笔者认为这和网络协议栈非常相似,用户在应用层发出简单的数据,然后经过传输层、网络层等,层层封装后真正把请求从物理层发出去,当请求结果回来后又层层解析,最终把最直接的结果返回给用户使用。
最重要的是,每一层都是抽象的,互不相关的!
因此在我们设计时,也可以借鉴这个思想,通过设置拦截器Interceptor,每个拦截器会做两件事情:
接收上一层拦截器封装后的request,然后自身对这个request进行处理,例如添加一些header,处理后向下传递; 接收下一层拦截器传递回来的response,然后自身对response进行处理,例如判断返回的statusCode,然后进一步处理。 那么,我们可以为拦截器定义一个抽象接口,然后去实现具体的拦截器。
interface Interceptor {
	Response intercept(Request request);
}
我们想象这个拦截器能够接收一个request,进行拦截处理,并返回结果。
但实际上,它无法返回结果,而且它在处理request后,并不能继续向下传递,因为它并不知道下一个Interceptor在哪里,也就无法继续向下传递。
那么,如何解决才能把所有Interceptor串在一起,并能够依次传递下去。
public interface Interceptor {
  Response intercept(Chain chain);

  interface Chain {
    Request request();

    Response proceed(Request request);
  }
}
使用方法如下:假如我们现在有三个Interceptor需要依次拦截:
// Build a full stack of interceptors.
List<Interceptor> interceptors = new ArrayList<>();
interceptors.add(new MyInterceptor1());
interceptors.add(new MyInterceptor2());
interceptors.add(new MyInterceptor3());

Interceptor.Chain chain = new RealInterceptorChain(
        interceptors, 0, originalRequest);
chain.proceed(originalRequest);
里面的RealInterceptorChain的基本思想是:我们把所有interceptors传进去,然后chain去依次把request传入到每一个interceptors进行拦截即可。
通过下面的示意图可以明确看出拦截流程:

其中,RetryAndFollowupInterceptor是用来做自动重试和自动重定向的拦截器;BridgeInterceptor是用来扩展request的header的拦截器。这两个拦截器存在于okhttp里,实际上在okhttp里还有好几个拦截器,这里暂时不做深入分析

-
CacheInterceptor
这是用来拦截请求并提供缓存的,当request进入这一层,它会自动去检查缓存,如果有,就直接返回缓存结果;否则的话才将request继续向下传递。而且,当下层把response返回到这一层,它会根据需求进行缓存处理; -
ConnectInterceptor
这一层是用来与目标服务器建立连接 -
CallServerInterceptor
这一层位于最底层,直接向服务器发出请求,并接收服务器返回的response,并向上层层传递。
上面几个都是okhttp自带的,也就是说需要在WingjayHttpClient自己实现的。除了这几个功能性的拦截器,我们还要支持用户自定义拦截器,主要有以下两种(见图中非虚线框蓝色字部分):
-
interceptors
这里的拦截器是拦截用户最原始的request。 -
NetworkInterceptor
这是最底层的request拦截器。
如何区分这两个呢?举个例子,我创建两个LoggingInterceptor,分别放在interceptors层和NetworkInterceptor层,然后访问一个会重定向的URL_1,当访问完URL_1后会再去访问重定向后的新地址URL_2。对于这个过程,interceptors层的拦截器只会拦截到URL_1的request,而在NetworkInterceptor层的拦截器则会同时拦截到URL_1和URL_2两个request。具体原因可以看上面的图。
同步、异步 Request池管理机制
这是非常核心的部分。
通过上面的工作,我们修改WingjayHttpClient后得到了下面的样子:
class WingjayHttpClient {
	public Response sendRequest(Request userRequest) {
		Request httpRequest = expandHeaders(userRequest);
		Response response = executeRequest(httpRequest);
		switch (response.statusCode()) {
			// 300: multi choice; 301: moven permanently;
			// 302: moved temporarily; 303: see other;
			// 307: redirect temporarily; 308: redirect permanently
			case 300:
			case 301:
			case 302:
			case 303:
			case 307:
			case 308:
				return handleRedirect(response);
			default:
				return response;
		}
	}

	private Request expandHeaders(Request userRequest) {...}
	private Response executeRequest(Request httpRequest) {...}
	private Response handleRedirect(Response response) {...}
}
也就是说,WingjayHttpClient现在能够同步地处理单个Request了。
然而,在实际应用中,一个WingjayHttpClient可能会被用于同时处理几十个用户request,而且这些request里还分成了同步和异步两种不同的请求方式,所以我们显然不能简单把一个request直接塞给WingjayHttpClient。
我们知道,一个request除了上面定义的http协议相关的内容,还应该要设置其处理方式同步和异步。那这些信息应该存在哪里呢?两种选择:
-
直接放入Request
从理论上来讲是可以的,但是却违背了初衷。我们最开始是希望用Request来构造符合http协议的一个请求,里面应该包含的是请求目标网址URL,请求端口,请求方法等等信息,而http协议是不关心这个request是同步还是异步之类的信息 -
创建一个类,专门来管理Request的状态
这是更为合适的,我们可以更好的拆分职责。
因此,这里选择创建两个类SyncCall和AsyncCall,用来区分同步和异步。
class SyncCall {
	private Request userRequest;

	public SyncCall(Request userRequest) {
		this.userRequest = userRequest;
	}
}

class AsyncCall {
	private Request userRequest;
	private Callback callback;

	public AsyncCall(Request userRequest, Callback callback) {
		this.userRequest = userRequest;
		this.callback = callback;
	}

	interface Callback {
		void onFailure(Call call, IOException e);
		void onResponse(Call call, Response response) throws IOException;
	}
}
基于上面两个类,我们的使用场景如下:
WingjayHttpClient client = new WingjayHttpClient();
// Sync
Request syncRequest = new Request("https://wingjay.com");
SyncCall syncCall = new SyncCall(request);
Response response = client.sendSyncCall(syncCall);
handle(response);

// Async
AsyncCall asyncCall = new AsyncCall(request, new CallBack() {
	  @Override
      public void onFailure(Call call, IOException e) {}

      @Override
      public void onResponse(Call call, Response response) throws IOException {
        handle(response);
      }
});
client.equeueAsyncCall(asyncCall);
从上面的代码可以看到,WingjayHttpClient的职责发生了变化:以前是response = client.sendRequest(request);,而现在变成了
response = client.sendSyncCall(syncCall);

client.equeueAsyncCall(asyncCall);
那么,我们也需要对WingjayHttpClient进行改造,基本思路是在内部添加请求池来对所有request进行管理。那么这个请求池我们怎么来设计呢?有两个方法:
-
直接在WingjayHttpClient内部创建几个容器
同样,从理论上而言是可行的。当用户把(a)syncCall传给client后,client自动把call存入对应的容器进行管理。 -
创建一个独立的类进行管理
显然这样可以更好的分配职责。我们把WingjayHttpClient的职责定义为,接收一个call,内部进行处理后返回结果。这就是WingjayHttpClient的任务,那么具体如何去管理这些request的执行顺序和生命周期,自然不需要由它来管。
因此,我们创建一个新的类:Dispatcher,这个类的作用是:
- 存储外界不断传入的SyncCall和AsyncCall,如果用户想取消则可以遍历所有的call进行cancel操作;
- 对于SyncCall,由于它是即时运行的,因此Dispatcher只需要在SyncCall运行前存储进来,在运行结束后移除即可;
- 对于AsyncCall,Dispatcher首先启动一个ExecutorService,不断取出AsyncCall去进行执行,然后,我们设置最多执行的request数量为64,如果已经有64个request在执行中,那么就将这个asyncCall存入等待区。 根据设计可以得到Dispatcher构造:
class Dispatcher {
	// sync call
	private final Deque<SyncCall> runningSyncCalls = new ArrayDeque<>();
	// async call
	private int maxRequests = 64;
	private final Deque<AsyncCall> waitingAsyncCalls = new ArrayDeque<>();
	private final Deque<AsyncCall> runningAsyncCalls = new ArrayDeque<>();
	private ExecutorService executorService;

	// begin execute Sync call
	public void startSyncCall(SyncCall syncCall) {
		runningSyncCalls.add(syncCall);
	}
	// finish Sync call
	public void finishSyncCall(SyncCall syncCall) {
		runningSyncCalls.remove(syncCall);
	}

	// enqueue a new AsyncCall
	public void enqueue(AsyncCall asyncCall) {
		if (runningAsyncCalls.size() < 64) {
			// run directly
			runningAsyncCalls.add(asyncCall);
			executorService.execute(asyncCall);
		} else {
			readyAsyncCalls.add(asyncCall);
		}
	}
	// finish a AsyncCall
	public void finishAsyncCall(AsyncCall asyncCall) {
		runningAsyncCalls.remove(asyncCall);
	}
}
有了这个Dispatcher,那我们就可以去修改WingjayHttpClient以实现
response = client.sendSyncCall(syncCall);

client.equeueAsyncCall(asyncCall);
这两个方法了。具体实现如下
[class WingjayHttpClient]

	private Dispatcher dispatcher;

	public Response sendSyncCall(SyncCall syncCall) {
		try {
			// store syncCall into dispatcher;
			dispatcher.startSyncCall(syncCall);
			// execute
			return sendRequest(syncCall.getRequest());
		} finally {
			// remove syncCall from dispatcher
			dispatcher.finishSyncCall(syncCall);
		}
	}

	public void equeueAsyncCall(AsyncCall asyncCall) {
		// store asyncCall into dispatcher;
		dispatcher.enqueue(asyncCall);
		// it will be removed when this asyncCall be executed
	}
基于以上,我们能够很好的处理同步和异步两种请求,使用场景如下:
WingjayHttpClient client = new WingjayHttpClient();
// Sync
Request syncRequest = new Request("https://wingjay.com");
SyncCall syncCall = new SyncCall(request);
Response response = client.sendSyncCall(syncCall);
handle(response);

// Async
AsyncCall asyncCall = new AsyncCall(request, new CallBack() {
	  @Override
      public void onFailure(Call call, IOException e) {}

      @Override
      public void onResponse(Call call, Response response) throws IOException {
        handle(response);
      }
});
client.equeueAsyncCall(asyncCall);
参考链接
源码分析
整体思路
从使用方法出发,首先是怎么使用,其次是我们使用的功能在内部是如何实现的,实现方案上有什么技巧,有什么范式。全文基本上是对 OkHttp 源码的一个分析与导读,非常建议大家下载 OkHttp 源码之后,跟着本文,过一遍源码。对于技巧和范式,由于目前我的功力还不到位,分析内容没多少,欢迎大家和我一起讨论。
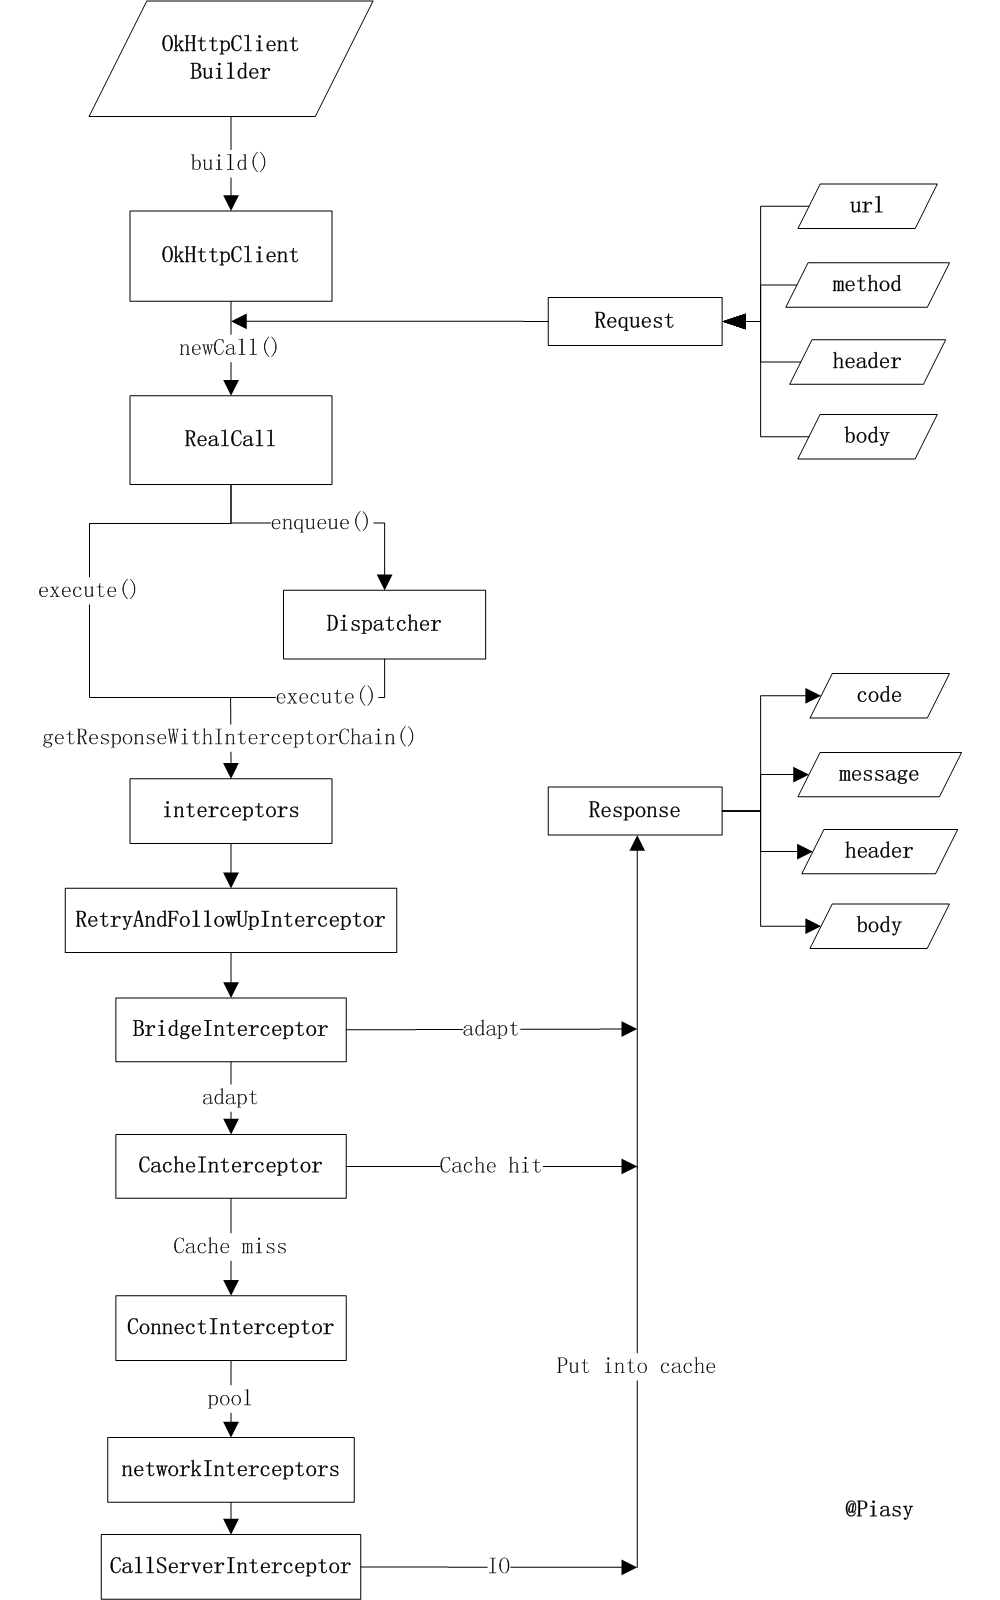
首先放一张完整流程图(看不懂没关系,慢慢往后看):
2,基本用例
来自 OkHttp 官方网站。
2.1,创建 OkHttpClient 对象
OkHttpClient client = new OkHttpClient();
咦,怎么不见 builder?莫急,且看其构造函数:
public OkHttpClient() {
  this(new Builder());
}
原来是方便我们使用,提供了一个“快捷操作”,全部使用了默认的配置。OkHttpClient.Builder 类成员很多,后面我们再慢慢分析,这里先暂时略过:
public Builder() {
  dispatcher = new Dispatcher();
  protocols = DEFAULT_PROTOCOLS;
  connectionSpecs = DEFAULT_CONNECTION_SPECS;
  proxySelector = ProxySelector.getDefault();
  cookieJar = CookieJar.NO_COOKIES;
  socketFactory = SocketFactory.getDefault();
  hostnameVerifier = OkHostnameVerifier.INSTANCE;
  certificatePinner = CertificatePinner.DEFAULT;
  proxyAuthenticator = Authenticator.NONE;
  authenticator = Authenticator.NONE;
  connectionPool = new ConnectionPool();
  dns = Dns.SYSTEM;
  followSslRedirects = true;
  followRedirects = true;
  retryOnConnectionFailure = true;
  connectTimeout = 10_000;
  readTimeout = 10_000;
  writeTimeout = 10_000;
}
2.2,发起 HTTP 请求
String run(String url) throws IOException {
  Request request = new Request.Builder()
      .url(url)
      .build();

  Response response = client.newCall(request).execute();
  return response.body().string();
}
OkHttpClient 实现了 Call.Factory,负责根据请求创建新的 Call,在 拆轮子系列:拆 Retrofit中我们曾和它发生过一次短暂的遭遇:
callFactory负责创建 HTTP 请求,HTTP 请求被抽象为了okhttp3.Call类,它表示一个已经准备好,可以随时执行的 HTTP 请求
那我们现在就来看看它是如何创建 Call 的:
/**
  * Prepares the {@code request} to be executed at some point in the future.
  */
@Override public Call newCall(Request request) {
  return new RealCall(this, request);
}
如此看来功劳全在 RealCall 类了,下面我们一边分析同步网络请求的过程,一边了解 RealCall 的具体内容。
2.2.1,同步网络请求
我们首先看 RealCall#execute:
@Override public Response execute() throws IOException {
  synchronized (this) {
    if (executed) throw new IllegalStateException("Already Executed");  // (1)
    executed = true;
  }
  try {
    client.dispatcher().executed(this);                                 // (2)
    Response result = getResponseWithInterceptorChain();                // (3)
    if (result == null) throw new IOException("Canceled");
    return result;
  } finally {
    client.dispatcher().finished(this);                                 // (4)
  }
}
这里我们做了 4 件事:
- 检查这个 call 是否已经被执行了,每个 call 只能被执行一次,如果想要一个完全一样的 call,可以利用
call#clone方法进行克隆。 - 利用
client.dispatcher().executed(this)来进行实际执行,dispatcher是刚才看到的OkHttpClient.Builder的成员之一,它的文档说自己是异步 HTTP 请求的执行策略,现在看来,同步请求它也有掺和。 - 调用
getResponseWithInterceptorChain()函数获取 HTTP 返回结果,从函数名可以看出,这一步还会进行一系列“拦截”操作。 - 最后还要通知
dispatcher自己已经执行完毕。
dispatcher 这里我们不过度关注,在同步执行的流程中,涉及到 dispatcher 的内容只不过是告知它我们的执行状态,比如开始执行了(调用 executed),比如执行完毕了(调用 finished),在异步执行流程中它会有更多的参与。
真正发出网络请求,解析返回结果的,还是 getResponseWithInterceptorChain:
private Response getResponseWithInterceptorChain() throws IOException {
  // Build a full stack of interceptors.
  List<Interceptor> interceptors = new ArrayList<>();
  interceptors.addAll(client.interceptors());
  interceptors.add(retryAndFollowUpInterceptor);
  interceptors.add(new BridgeInterceptor(client.cookieJar()));
  interceptors.add(new CacheInterceptor(client.internalCache()));
  interceptors.add(new ConnectInterceptor(client));
  if (!retryAndFollowUpInterceptor.isForWebSocket()) {
    interceptors.addAll(client.networkInterceptors());
  }
  interceptors.add(new CallServerInterceptor(
      retryAndFollowUpInterceptor.isForWebSocket()));

  Interceptor.Chain chain = new RealInterceptorChain(
      interceptors, null, null, null, 0, originalRequest);
  return chain.proceed(originalRequest);
}
在 OkHttp 开发者之一介绍 OkHttp 的文章里面,作者讲到:
the whole thing is just a stack of built-in interceptors.
可见 Interceptor 是 OkHttp 最核心的一个东西,不要误以为它只负责拦截请求进行一些额外的处理(例如 cookie),实际上它把实际的网络请求、缓存、透明压缩等功能都统一了起来,每一个功能都只是一个 Interceptor,它们再连接成一个 Interceptor.Chain,环环相扣,最终圆满完成一次网络请求。
从 getResponseWithInterceptorChain 函数我们可以看到,Interceptor.Chain 的分布依次是:

- 在配置
OkHttpClient时设置的interceptors; - 负责失败重试以及重定向的
RetryAndFollowUpInterceptor; - 负责把用户构造的请求转换为发送到服务器的请求、把服务器返回的响应转换为用户友好的响应的
BridgeInterceptor; - 负责读取缓存直接返回、更新缓存的
CacheInterceptor; - 负责和服务器建立连接的
ConnectInterceptor; - 配置
OkHttpClient时设置的networkInterceptors; - 负责向服务器发送请求数据、从服务器读取响应数据的
CallServerInterceptor。
在这里,位置决定了功能,最后一个 Interceptor 一定是负责和服务器实际通讯的,重定向、缓存等一定是在实际通讯之前的。
责任链模式在这个 Interceptor 链条中得到了很好的实践(感谢 Stay 一语道破,自愧弗如)。
它包含了一些命令对象和一系列的处理对象,每一个处理对象决定它能处理哪些命令对象,它也知道如何将它不能处理的命令对象传递给该链中的下一个处理对象。该模式还描述了往该处理链的末尾添加新的处理对象的方法。
对于把 Request 变成 Response 这件事来说,每个 Interceptor 都可能完成这件事,所以我们循着链条让每个 Interceptor 自行决定能否完成任务以及怎么完成任务(自力更生或者交给下一个 Interceptor)。这样一来,完成网络请求这件事就彻底从 RealCall 类中剥离了出来,简化了各自的责任和逻辑。两个字:优雅!
责任链模式在安卓系统中也有比较典型的实践,例如 view 系统对点击事件(TouchEvent)的处理,具体可以参考Android设计模式源码解析之责任链模式中相关的分析。
回到 OkHttp,在这里我们先简单分析一下 ConnectInterceptor 和 CallServerInterceptor,看看 OkHttp 是怎么进行和服务器的实际通信的。
2.2.1.1,建立连接:ConnectInterceptor
@Override public Response intercept(Chain chain) throws IOException {
  RealInterceptorChain realChain = (RealInterceptorChain) chain;
  Request request = realChain.request();
  StreamAllocation streamAllocation = realChain.streamAllocation();

  // We need the network to satisfy this request. Possibly for validating a conditional GET.
  boolean doExtensiveHealthChecks = !request.method().equals("GET");
  HttpCodec httpCodec = streamAllocation.newStream(client, doExtensiveHealthChecks);
  RealConnection connection = streamAllocation.connection();

  return realChain.proceed(request, streamAllocation, httpCodec, connection);
}
实际上建立连接就是创建了一个 HttpCodec 对象,它将在后面的步骤中被使用,那它又是何方神圣呢?它是对 HTTP 协议操作的抽象,有两个实现:Http1Codec 和 Http2Codec,顾名思义,它们分别对应 HTTP/1.1 和 HTTP/2 版本的实现。
在 Http1Codec 中,它利用 Okio 对 Socket 的读写操作进行封装,Okio 以后有机会再进行分析,现在让我们对它们保持一个简单地认识:它对 java.io 和 java.nio 进行了封装,让我们更便捷高效的进行 IO 操作。
而创建 HttpCodec 对象的过程涉及到 StreamAllocation、RealConnection,代码较长,这里就不展开,这个过程概括来说,就是找到一个可用的 RealConnection,再利用 RealConnection 的输入输出(BufferedSource 和 BufferedSink)创建 HttpCodec 对象,供后续步骤使用。
2.2.1.2,发送和接收数据:CallServerInterceptor
@Override public Response intercept(Chain chain) throws IOException {
  HttpCodec httpCodec = ((RealInterceptorChain) chain).httpStream();
  StreamAllocation streamAllocation = ((RealInterceptorChain) chain).streamAllocation();
  Request request = chain.request();

  long sentRequestMillis = System.currentTimeMillis();
  httpCodec.writeRequestHeaders(request);

  if (HttpMethod.permitsRequestBody(request.method()) && request.body() != null) {
    Sink requestBodyOut = httpCodec.createRequestBody(request, request.body().contentLength());
    BufferedSink bufferedRequestBody = Okio.buffer(requestBodyOut);
    request.body().writeTo(bufferedRequestBody);
    bufferedRequestBody.close();
  }

  httpCodec.finishRequest();

  Response response = httpCodec.readResponseHeaders()
      .request(request)
      .handshake(streamAllocation.connection().handshake())
      .sentRequestAtMillis(sentRequestMillis)
      .receivedResponseAtMillis(System.currentTimeMillis())
      .build();

  if (!forWebSocket || response.code() != 101) {
    response = response.newBuilder()
        .body(httpCodec.openResponseBody(response))
        .build();
  }

  if ("close".equalsIgnoreCase(response.request().header("Connection"))
      || "close".equalsIgnoreCase(response.header("Connection"))) {
    streamAllocation.noNewStreams();
  }

  // 省略部分检查代码

  return response;
}
我们抓住主干部分:
- 向服务器发送 request header;
- 如果有 request body,就向服务器发送;
- 读取 response header,先构造一个
Response对象; - 如果有 response body,就在 3 的基础上加上 body 构造一个新的
Response对象;
这里我们可以看到,核心工作都由 HttpCodec 对象完成,而 HttpCodec 实际上利用的是 Okio,而 Okio 实际上还是用的 Socket,所以没什么神秘的,只不过一层套一层,层数有点多。
其实 Interceptor 的设计也是一种分层的思想,每个 Interceptor 就是一层。为什么要套这么多层呢?分层的思想在 TCP/IP 协议中就体现得淋漓尽致,分层简化了每一层的逻辑,每层只需要关注自己的责任(单一原则思想也在此体现),而各层之间通过约定的接口/协议进行合作(面向接口编程思想),共同完成复杂的任务。
简单应该是我们的终极追求之一,尽管有时为了达成目标不得不复杂,但如果有另一种更简单的方式,我想应该没有人不愿意替换。
2.2.2,发起异步网络请求
client.newCall(request).enqueue(new Callback() {
    @Override
    public void onFailure(Call call, IOException e) {
    }

    @Override
    public void onResponse(Call call, Response response) throws IOException {
        System.out.println(response.body().string());
    }
});

// RealCall#enqueue
@Override public void enqueue(Callback responseCallback) {
  synchronized (this) {
    if (executed) throw new IllegalStateException("Already Executed");
    executed = true;
  }
  client.dispatcher().enqueue(new AsyncCall(responseCallback));
}

// Dispatcher#enqueue
synchronized void enqueue(AsyncCall call) {
  if (runningAsyncCalls.size() < maxRequests && runningCallsForHost(call) < maxRequestsPerHost) {
    runningAsyncCalls.add(call);
    executorService().execute(call);
  } else {
    readyAsyncCalls.add(call);
  }
}
这里我们就能看到 dispatcher 在异步执行时发挥的作用了,如果当前还能执行一个并发请求,那就立即执行,否则加入 readyAsyncCalls 队列,而正在执行的请求执行完毕之后,会调用 promoteCalls() 函数,来把 readyAsyncCalls 队列中的 AsyncCall “提升”为 runningAsyncCalls,并开始执行。
这里的 AsyncCall 是 RealCall 的一个内部类,它实现了 Runnable,所以可以被提交到 ExecutorService 上执行,而它在执行时会调用 getResponseWithInterceptorChain() 函数,并把结果通过 responseCallback 传递给上层使用者。
这样看来,同步请求和异步请求的原理是一样的,都是在 getResponseWithInterceptorChain() 函数中通过 Interceptor 链条来实现的网络请求逻辑,而异步则是通过 ExecutorService 实现。
2.3,返回数据的获取
在上述同步(Call#execute() 执行之后)或者异步(Callback#onResponse() 回调中)请求完成之后,我们就可以从 Response 对象中获取到响应数据了,包括 HTTP status code,status message,response header,response body 等。这里 body 部分最为特殊,因为服务器返回的数据可能非常大,所以必须通过数据流的方式来进行访问(当然也提供了诸如 string() 和 bytes() 这样的方法将流内的数据一次性读取完毕),而响应中其他部分则可以随意获取。
响应 body 被封装到 ResponseBody 类中,该类主要有两点需要注意:
- 每个 body 只能被消费一次,多次消费会抛出异常;
- body 必须被关闭,否则会发生资源泄漏;
在 2.2.1.2,发送和接收数据:CallServerInterceptor 小节中,我们就看过了 body 相关的代码:
if (!forWebSocket || response.code() != 101) {
  response = response.newBuilder()
      .body(httpCodec.openResponseBody(response))
      .build();
}
由 HttpCodec#openResponseBody 提供具体 HTTP 协议版本的响应 body,而 HttpCodec 则是利用 Okio 实现具体的数据 IO 操作。
这里有一点值得一提,OkHttp 对响应的校验非常严格,HTTP status line 不能有任何杂乱的数据,否则就会抛出异常,在我们公司项目的实践中,由于服务器的问题,偶尔 status line 会有额外数据,而服务端的问题也毫无头绪,导致我们不得不忍痛继续使用 HttpUrlConnection,而后者在一些系统上又存在各种其他的问题,例如魅族系统发送 multi-part form 的时候就会出现没有响应的问题。
2.4,HTTP 缓存
在 2.2.1,同步网络请求 小节中,我们已经看到了 Interceptor 的布局,在建立连接、和服务器通讯之前,就是 CacheInterceptor,在建立连接之前,我们检查响应是否已经被缓存、缓存是否可用,如果是则直接返回缓存的数据,否则就进行后面的流程,并在返回之前,把网络的数据写入缓存。
这块代码比较多,但也很直观,主要涉及 HTTP 协议缓存细节的实现,而具体的缓存逻辑 OkHttp 内置封装了一个 Cache 类,它利用 DiskLruCache,用磁盘上的有限大小空间进行缓存,按照 LRU 算法进行缓存淘汰,这里也不再展开。
我们可以在构造 OkHttpClient 时设置 Cache 对象,在其构造函数中我们可以指定目录和缓存大小:
public Cache(File directory, long maxSize);
而如果我们对 OkHttp 内置的 Cache 类不满意,我们可以自行实现 InternalCache 接口,在构造 OkHttpClient 时进行设置,这样就可以使用我们自定义的缓存策略了。
3,总结
OkHttp 还有很多细节部分没有在本文展开,例如 HTTP2/HTTPS 的支持等,但建立一个清晰的概览非常重要。对整体有了清晰认识之后,细节部分如有需要,再单独深入将更加容易。
在文章最后我们再来回顾一下完整的流程图:
OkHttpClient实现Call.Factory,负责为Request创建Call;RealCall为具体的Call实现,其enqueue()异步接口通过Dispatcher利用ExecutorService实现,而最终进行网络请求时和同步execute()接口一致,都是通过getResponseWithInterceptorChain()函数实现;getResponseWithInterceptorChain()中利用Interceptor链条,分层实现缓存、透明压缩、网络 IO 等功能;
参考链接